FASTPASS SYSTEM HAS BEEN CANCELLED AND WILL BE REPLACED BY DISNEY GENIE SERVICE.
Check on DisneyWorld.com to keep updated.
Step-by-Step Directions for making FastPass+ Reservations at Disney World
By Catherine Lauer & Stephen Ashley
This is our “how to” page with step-by-step instructions. To read about how FastPass+ reservations work and to find answers to commonly asked questions, read our article here:
Disney World FastPass+ Reservations Explained and Made Easy
Let’s get you some FastPasses!
On this page you’ll learn how to:
- Access Disney’s FastPass+ system
- Sign up for a Disney Account
- Link your park tickets to your account
- Link the tickets of anyone else you want to make FastPass+ reservations for
- Make your FastPass+ reservations
We’ll include some screen shots so you know exactly what to look for on the Disney site.
STEP 1: Decide how to access Disney World’s FastPass+ Reservation System
There are two ways to access Disney’s FastPass+ reservation system:
- If you have a smart phone or tablet, you can download the app. In your app store, search for “My Disney Experience” and download it. It’s free.
- On Disney’s website, on their My Disney Experience page.
Tip from Stephen Ashley: You’ll want to use both the app and the website if you can, but I find it easiest to make my initial FastPass+ reservations on the Disney website using a computer. It’s just faster, works more consistently and feels easier. So I’d recommend making all your reservations on a computer if it’s at all possible, and then downloading the app and taking your smart phone or tablet with you on your trip so you can access and manage your FastPass+ reservations while you’re at Disney.
STEP 2: Create a Disney World Account.
In order to make FastPass+ reservations ahead of time, you’ll need an account with Disney. If you do not have an account, just follow these steps and you’ll be well on your way to enjoying some Disney Magic!
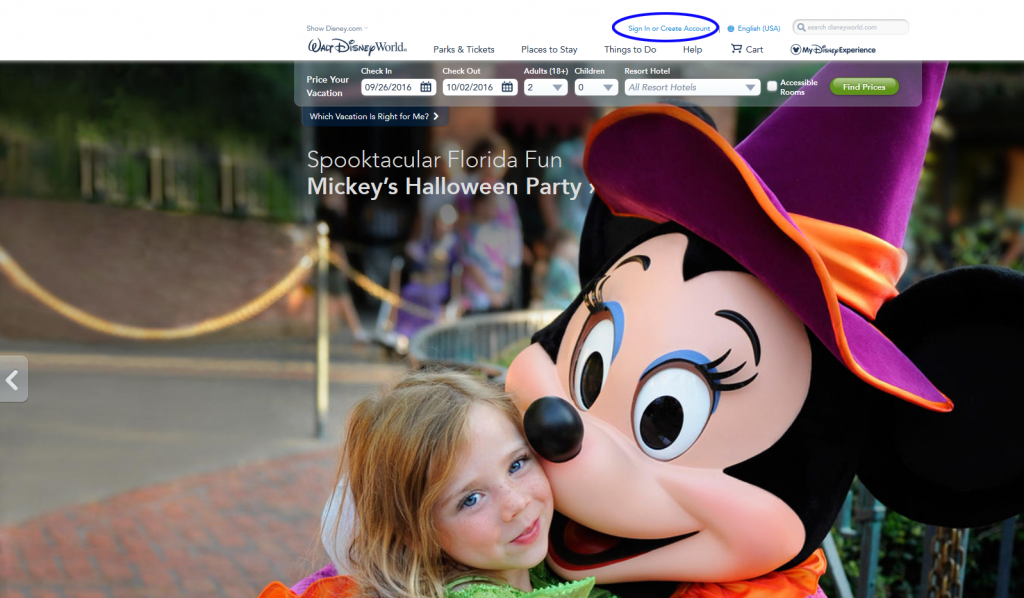
1. First, if you’re on a computer, go to disneyworld.disney.go.com and locate the “Sign In or Create an Account” button located on the top header of the website (it’s circled in blue in the image below).
If you’re using the app on a mobile device, locate it in the menu bar on the top left.
2. Give Disney the info they’re asking you for, and follow the prompts. In order to make an account, all you will need is:
- A valid e-mail address that you can access. If you don’t have one, you can get one for free through gmail.com or hotmail.com.
- Basic contact information.
You’ll be asked to make a password for your Disney account. In the future you’ll log in using your e-mail address and the password that you choose. Once you do this, you have created your account!
STEP 3: Link your party’s Disney park tickets to Your Account
Now that you’ve got your account with Disney, you can link your tickets to your account, allowing you to make FastPass+ reservations! Here’s what you do on Disney’s website:
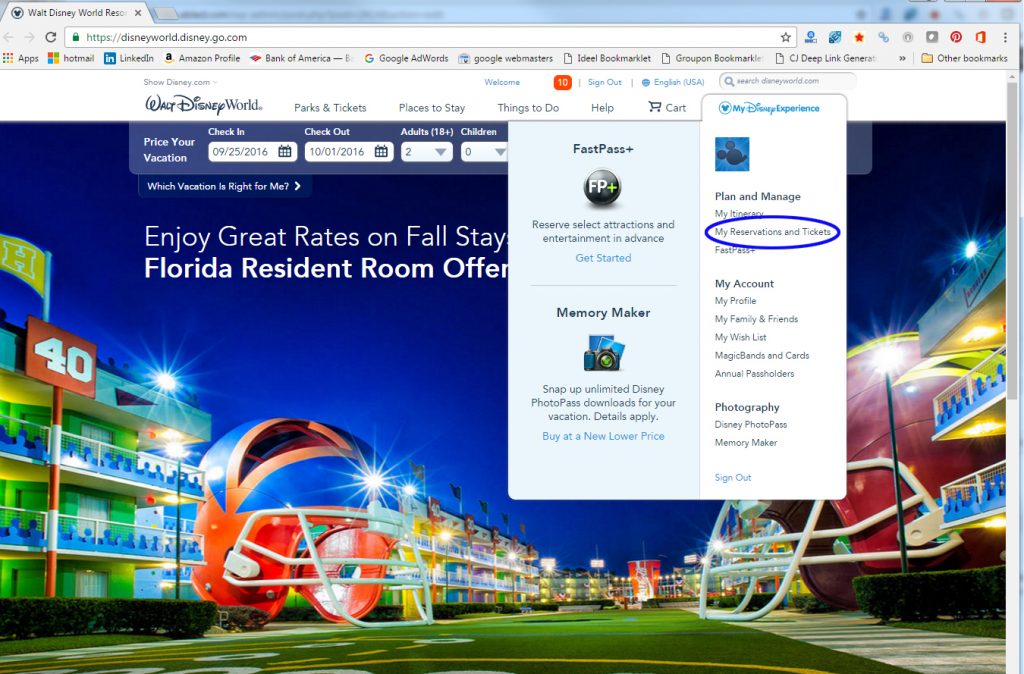
— Make sure that you’re logged in and hover on the My Disney Experience button in the upper right, just under the search bar.
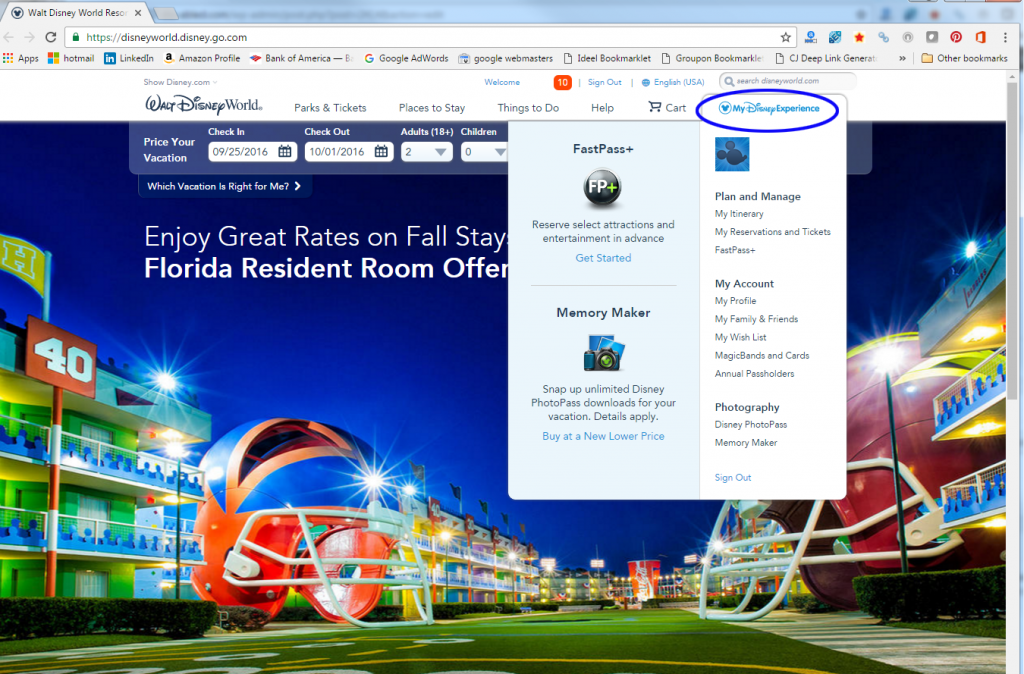
— Next, select “My Reservations and Tickets”:
— Scroll down to the “Tickets and Passes” section and check to see if your tickets are already listed there. If they are, skip the rest of this section and go right to Step 4: Make Your FastPass+ Reservations.
— If your tickets are not linked to your account yet, Click on the “Link Tickets” button which is right under the Tickets and Passes section. You’ll see a space to input an ID Number. Here’s how to find out what your Ticket ID Number(s) is:
- If you have a MagicBand, use the 12-digit Band ID which is on the back of your Magic Band. You may need reading glasses – it’s tiny!
- If you have a ticket, look at the right side of the screen on the Disney site. There are several different
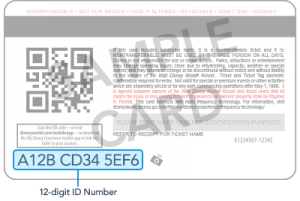 formats of tickets. To the right is an example of one of them. You’ll need to find the one that looks just like your ticket. Once you’ve found the right format, check out the light blue highlighted area. This is where you’ll find the ID Number on your own ticket. Now enter that ID number into the ID Number field.
To add another ticket, click on the + Add Another ID Number field. Repeat this until you’ve linked all the tickets for everyone in your party.
STEP 4: Family & Friends list: Link park tickets of people who are NOT in your party to your account so that you can make FastPass+ reservations for them too.
If you’re thinking about meeting up with someone who is not on your reservation and want to make some FastPass+ reservations with them too, you can! You can make FastPass+ reservations for:
- Any member of your party (anyone travelling with you who is listed in the package you purchase from Disney, or who is staying with you in your room).
- Anyone you want to link to your account by using Disney’s Family and Friends option.
To begin connecting others to your Disney World account, do this:
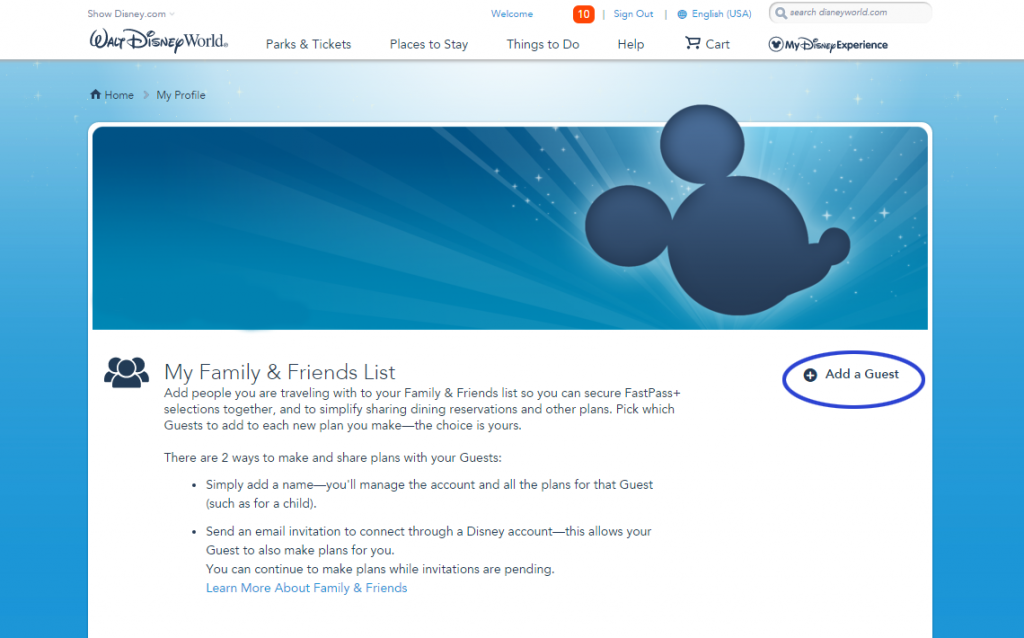
Hover over the My Disney Experience tab, and click on “My Family and Friends.” If you’re logged in, you can use this quick link: Disney’s Family and Friends page.
Choose “Add a Guest”. See the correct option to click on circled in blue below.
Now you can add people three ways:
Here are the three options and their processes explained:
1. Choose from a list of people that Disney thinks you may know: If you’re already connected to others, you can invite anyone on their lists. Disney will show you those people, and you can have Disney send them an invitation. If they accept, you’re linked!
2. Link to others through their Disney Resort Reservation. There are two way to do this. Either you’ll need the Disney Resort Reservation confirmation number that is associated with their active ticket and their last name, or the last name that’s on the reservation, along with the Disney resort hotel they’re booked at, phone number associated with the reservation with, and their arrival date.
3. By entering a name. When you choose this option, you’ll fill in their first and last name and age. Age goes up to 18+, so if they’re 18 years old or more, you won’t need the exact age. Next you’ll choose to either manage all plans for this guest, or to just send them an invitation to connect. If you choose to send an invitation, you’ll need the email address that’s associated with their My Disney Experience account.
Now Disney will send an e-mail invitation to that person asking them to connect with you. They’ll need to accept the invitation inside their My Disney Experience account. Once they accept your invite to join your family and friends group, you’ll see a check mark by their name in your account. Now you can make FastPass+ selections for them as well!
STEP 5: Make your FastPass+ Reservations
You can make up to three FastPass+ reservations a day for each member of your party. You can have them all go on the same rides and attractions, or you can split them up and have them go their separate ways. Here’s what you do:
– Sign into your Disney World account if you haven’t:
Go to disneyworld.disney.go.com, or through your My Disney Experience App on your mobile device.
– Go to the FastPass+ start page:
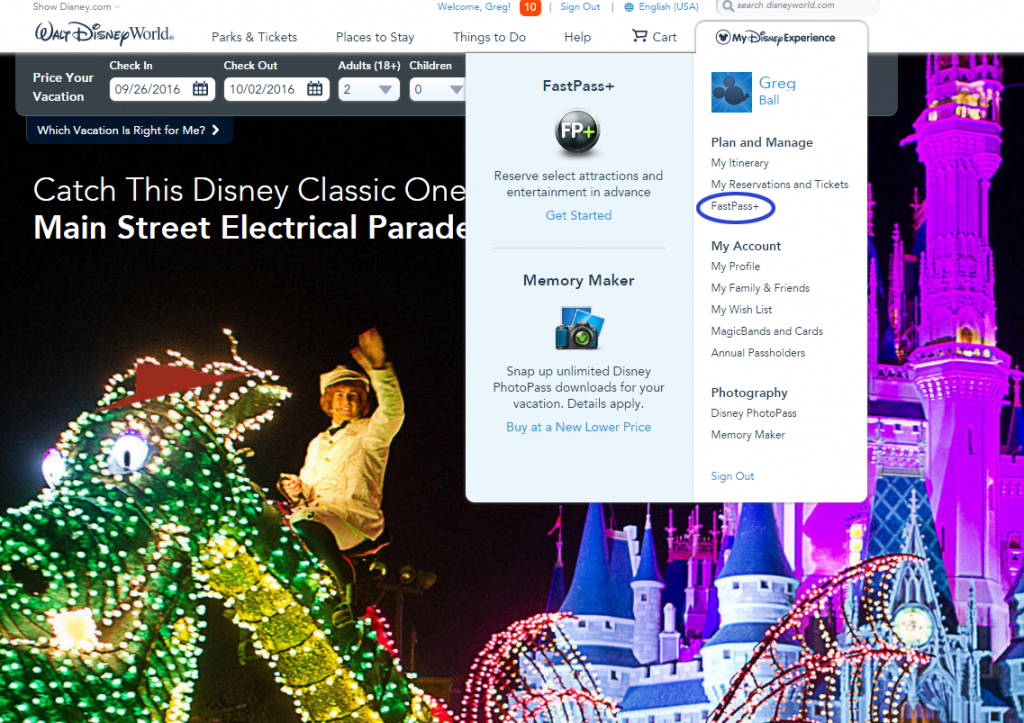
On the website, hover over the My Disney Experience tab in the upper right of the page. Scroll down to the “FastPass+” button and click on it.
On the app, pull down the menu on the upper left side. Click on FastPass+.
– Choose Add a FastPass+:
On the app, click on the plus sign on the upper right corner. I’ts a white plus sign inside a blue circle.
– Give Disney all the info they need to get you the right FastPass+ reservation.
First, click on all the the individuals you want to get a FastPass+ for. Then hit “Next”.
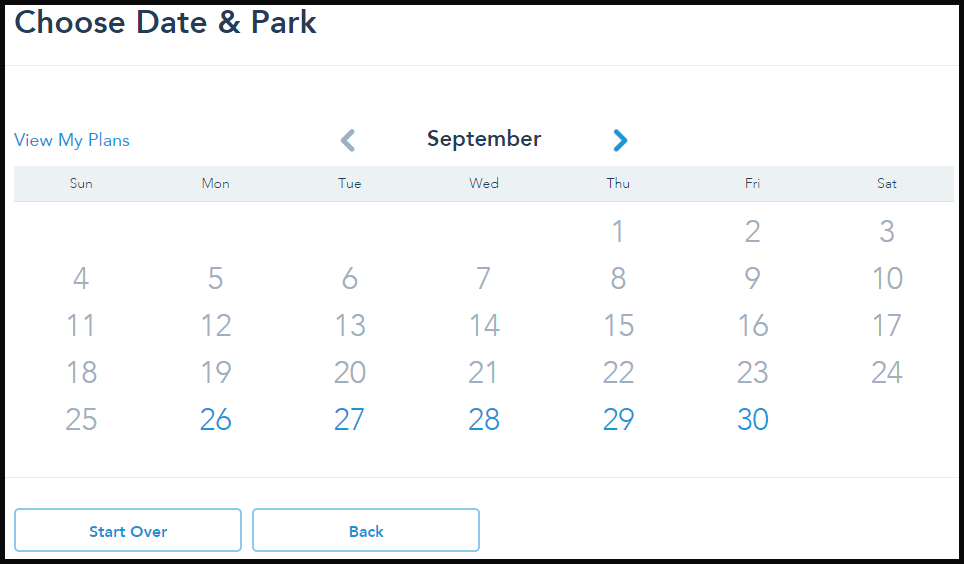
Now pick the date that you want to make the FastPass+ reservation on. You’ll see that some dates are grey, and some are blue and clickable. You can only get a FastPass+ for the blue dates. Those are the ones you’re eligible for (see above). If no dates are blue and clickable, then you are not within the appropriate time period.
Click on your chosen date.
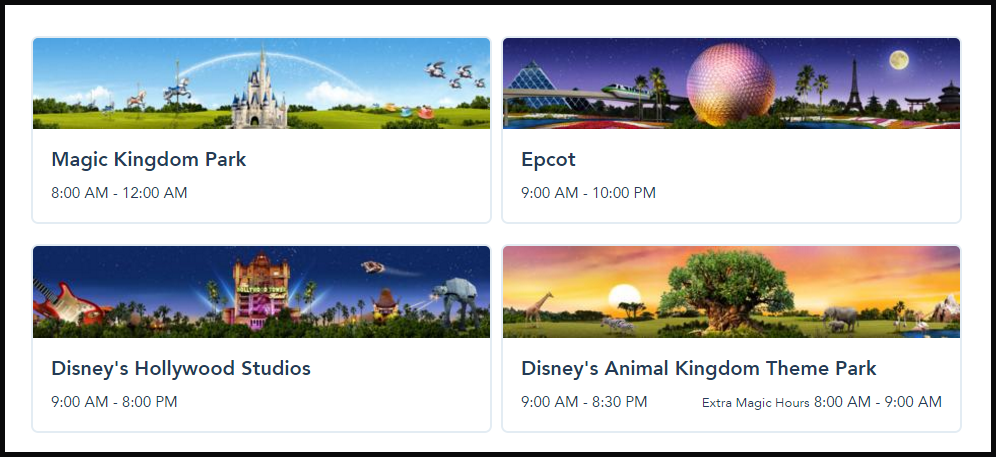
Next under the calendar, you’ll see four images pop up that represent the four main theme parks. Click on the one you want the FastPass+ for.
– Now you can pick your attraction, show or character meet & greet.
And now you get to the fun stuff. Attractions, shows and character meets will appear along with available times.
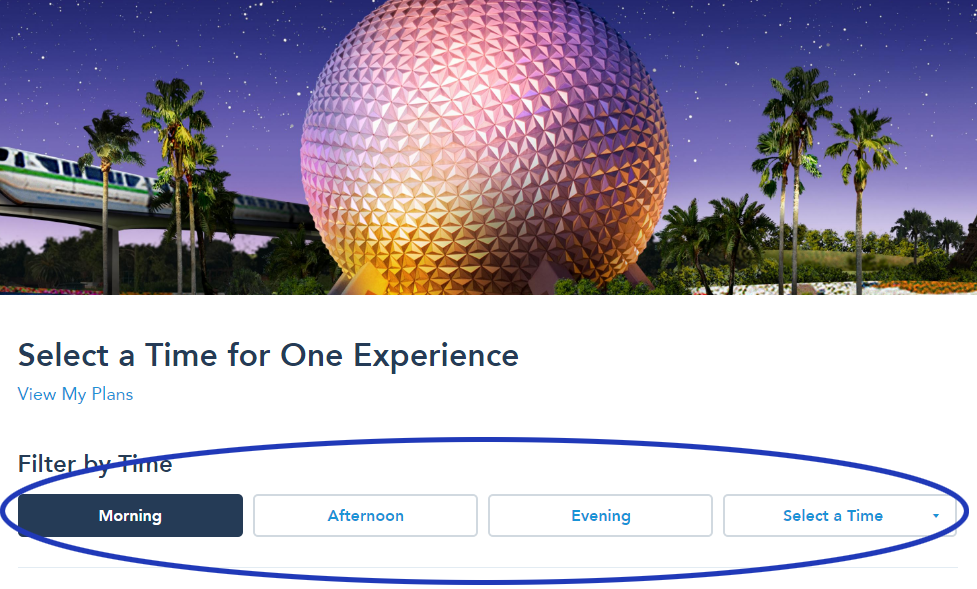
When you get to this page, Disney will give you attraction times in the morning. You can change that by picking either afternoon or evening, or you can select a time using the drop down box on the right. Pick what works best for your party and schedule, keeping your dining reservations in mind.
Choose the FastPass+ you want. You’ll now get the confirmation page with your FastPass+ attraction, time, and the party that it’s for.
Click on “Confirm” to finish the process.
Lastly, you’ll be asked if you want another FastPass+, and if you want it on the same day or a different day. Choose, and continue. Keep repeating the cycle until you’re all done.
You’re now all set to go to Disney with your friends and family!
For more Disney World planning tips, check out this page here:
Easy Steps for Planning Your Trip to Disney World
Do you have more FastPass+ tips? Please feel free to post them in a comment below.
We’d love your input.
Also Join our facebook Group!!!!
Come meet me there, ask any questions, share your knowledge and just enjoy getting to know other Disney fanatics in our facebook group called Walt Disney World Made Easy for Everyone.
Also join me on Pinterest here.
GET UPDATES, NEWS & TIPS (IT’S FREE!!!)
Sign up below to stay updated on the newest information, tips and tricks to help you plan your perfect Disney World trip!


